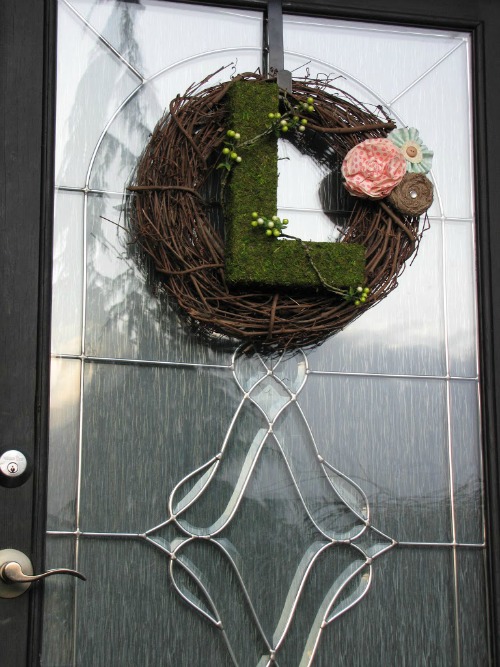
Hi there! I hope everyone is having a great week! I have been working on this wreath forever and finally got it finished today. For some reason, I wasn’t particualrly motivated to work on this project. It has been laying on the basement floor for weeks so I decided I had better get it done!
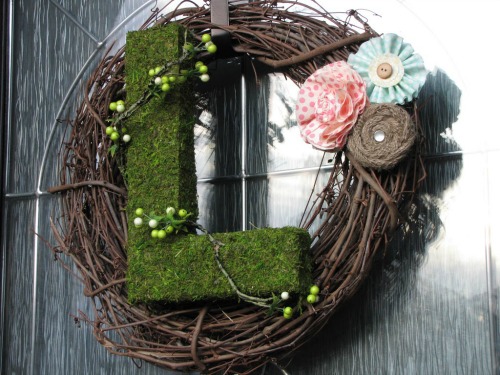
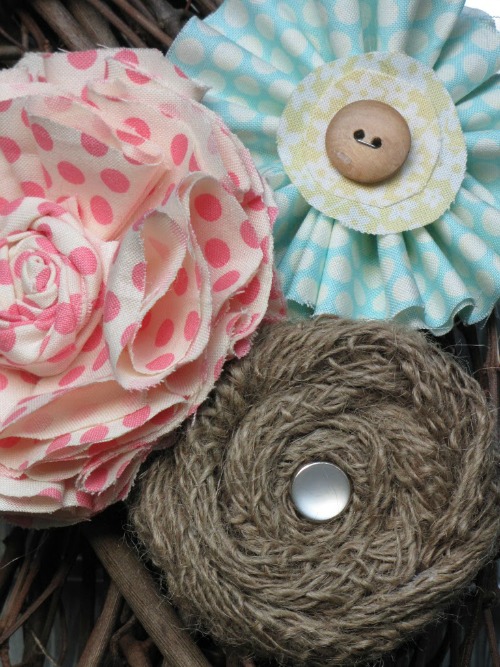
I attached the letter with hot glue to the grapevine wreath. The ‘L’ looked very unbalanced on the wreath by itself so I spent another few days pondering over what I was going to add. Since I LOVE fabric {even though I cannot sew a stitch!}, I decided to add some fabric flowers.
Finally I have a wreath for the front door again!
Now I just have to do the rest of the front entrance! It definitely needs a good clean and some flowers to spruce things up. But for now, at least I have my wreath!
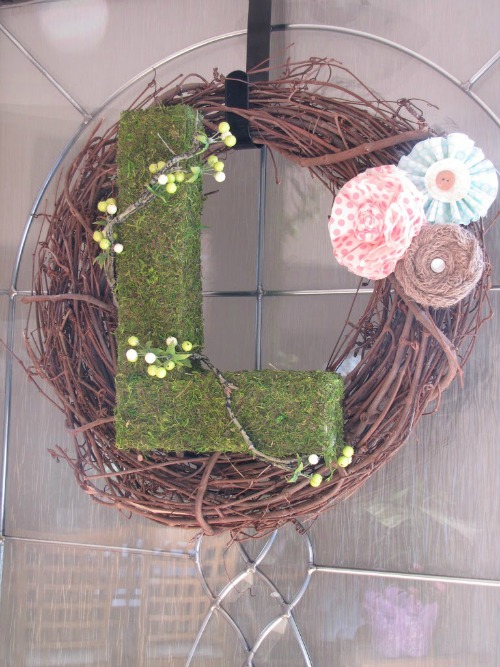
I have loved all of the moss initial wreaths that I have been seeing around the blogosphere and knew I had to have one! I really wanted a nice symmetrical letter like an ‘S’ or a ‘T’ but, alas, I am an ‘L’. I did ask if my husband would consider changing our last name but no luck!
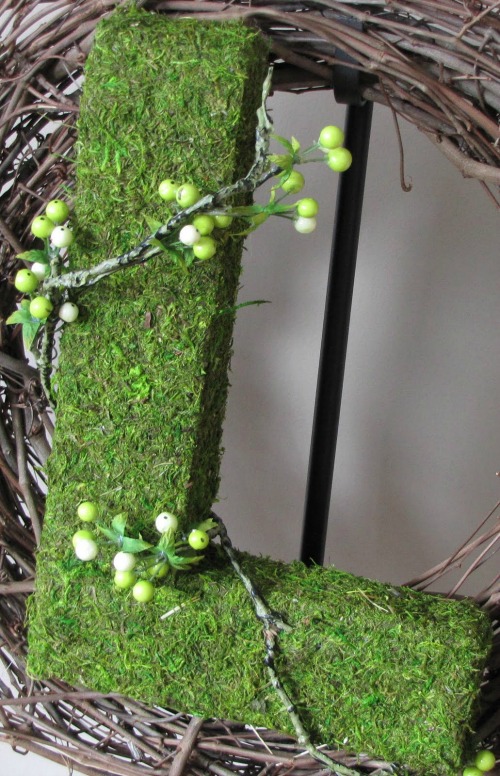
If you are making a moss initial I would highly recommend spending the extra money and getting the sheet moss. If you use a coupon, there is not a huge difference in price. It was still messy but so much easier than gluing a whole bunch of random moss pieces on! My letter was a large, cardboard {papermache?} one that I purchased at Jo-Anne’s. I think it was about $3 or $4. I just cut the moss out like fabric and wrapped up the letter almost like I was wrapping a present. Add some hot glue and you are done! It literally took me about 10 minutes.
To add a little more interest to my boring ol’ L, I added some berry twig branches that were left over from my Spring tree and Butterfly projects.
I attached the letter with hot glue to the grapevine wreath. The ‘L’ looked very unbalanced on the wreath by itself so I spent another few days pondering over what I was going to add. Since I LOVE fabric {even though I cannot sew a stitch!}, I decided to add some fabric flowers.
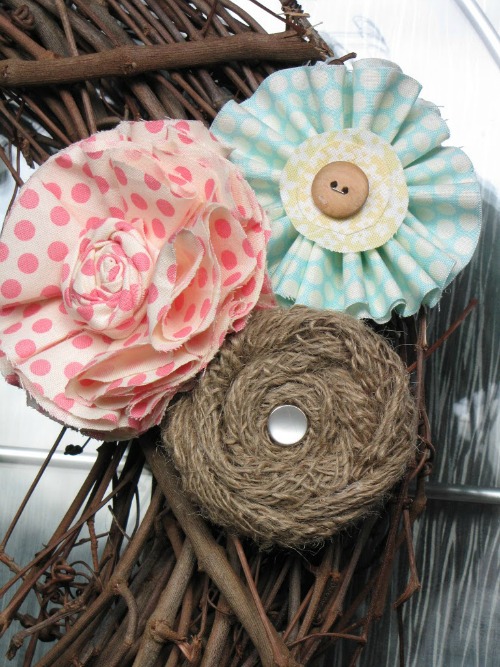
The burlap flower is just the basic rosette rolled flower with a little brad in the middle. There is an awesome video tutorial on how to make these little guys over at Freckled Laundry.
Here’s how to make the pink one:
Here’s how to make the pink one:
-
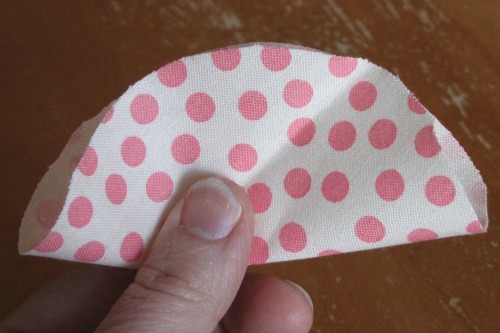
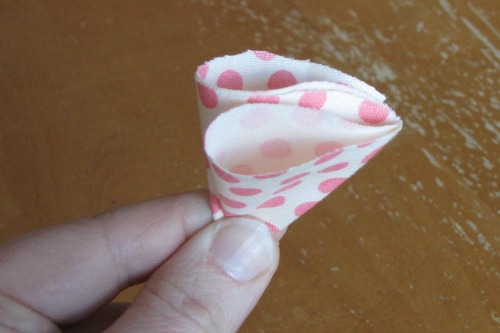
Cut a bunch of circles out of your fabric. I think I used about 12. I actually would have liked to have added a few more but ran out of fabric. The circles don’t have to be perfect. You should be able to cut 5 or 6 at a time.
-
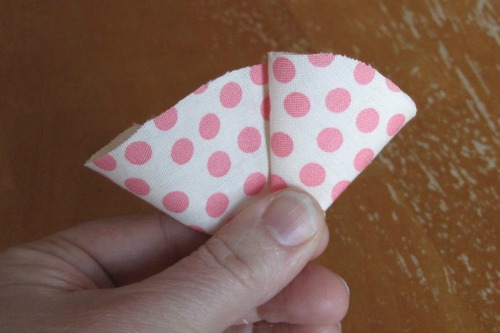
Take one of your circles and fold it in half.
-
Take one corner and fold it forwards towards the middle. Hot glue in place.
- Take the other corner and fold it backwards towards the center. Hot glue in place.
-
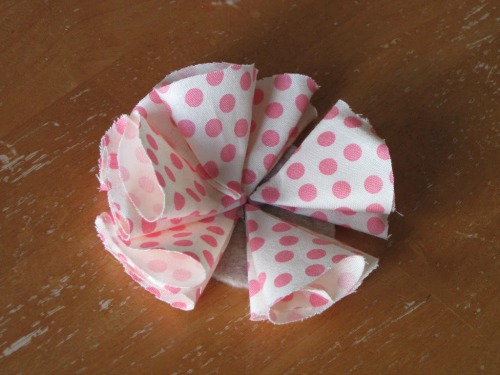
Cut out a circle from felt to use as your base and start hot gluing your cones to the center. Since I was short on fabric I staggered them a bit. Keep going until all of the gaps are filled in and your flower is as full as you would like.
-
Add a small rolled flower to the center {like the burlap one}.
For the blue flower, I cut out a circular piece of felt for the base and a fabric strip that was approximatley 3 inches by 20 inches. I folded the strip in half {width wise} and simply did an accordian fold all the way around. Every 5 or 6 folds I adhered it to the center with hot glue. For the center, I cut out a couple of circles from yellow fabric and added a button.
Finally I have a wreath for the front door again!
Now I just have to do the rest of the front entrance! It definitely needs a good clean and some flowers to spruce things up. But for now, at least I have my wreath!
Have a good week!
Very cute! I have been thinking about doing something with the moss I have. I love the flowers and will be trying those out soon!
Kassandra
Coffee and their Kisses
Very cute! I have a giant letter sitting around which I’m still trying to decide what to do with it!
That is just plain awesome!
LOVE IT! well done….and happen to LIKE L!
heehee
xo
This is so pretty! Thanks for the detailing steps on making the flowers — and I love the berry vine you wrapped around the “L” — lovely!
Okay, how much do I love it with moss monogram?!?!?! Great job! I LOVE it!
Cara
http://miscellaneousme.wordpress.com
Hi I am a new follower. I am happy that I found your blog.
You can visit me any time.
http://thisnthatboutiqueblog.blogspot.com/
http://www.etsy.com/shop/ThisanThatBoutique
So pretty! The moss letter and flowers are perfect! I love it. Thanks for sharing!
So sweet! Happy Friday,Happy Good Friday, Happy Earth Day, Happy Jelly Bean Day ( yes it’s actually jelly bean day)Hugs from Katherine. P.S have you entered my giveaway?
Beautiful! Thanks for showing how to make the flowers – filing that info away for sure!
Love this wreath! I love the moss initial and am crazy about the flowers! The colors are great! Have a great weekend!
This is adorable. I just made a wreath like this but covered the words HI instead. Love it.
ound you via be different act normal
I adore it! I wish it wasn’t so windy where I live 🙁 It would blow right off my door!
I love the monogram. we have an L too. so cute!
This is very cute. I am an “L” too which is sometimes not the prettiest letter, but I like what you did with it!
megan
craftycpa.blogspot.com
Love the initial wreath! Great job on it!
I would love for you to share this at my linky party @ {nifty thrifty things}!
xoxo,
Vanessa
Lovely!! Those Moss wreaths turn out so pretty. I would love it if you would link this project up to my blog party, A Marvelous Mess….each week I pick one project to feature on my side bar!! Here is the link: http://tinyurl.com/3chfp5t
I LOVE this! I have been wanting to make a new spring wreath and you have definitely inspired me! 🙂 I am a new follower here and I would LOVE it if you would link this up to my new Inspire Me Mondays Blog Party @ http://www.homemakerinheels.com/2011/04/inspire-me-monday-week-1-is-here-come.html
Blessings!
Crysta 🙂
Moss is so popular right now and you did a great job! So cute!
HI!!!!! found your blog through hoooo’s got talent and i just love this wreath!! i have been wanting to make one for my front door and this gives me inspiration!! its so pretty!
LOVE this too!!
I LOVE your post and Love your blog!
I would LOVE to have you link up to my Whassup Wednesday Par-Tay! And I have a party button you can grab and put on your blog so your friends can come too:) You ahve a good chance at being featured!
If you are NOT already a Follower of Elements Interiors….HELLEEERRRR!
Click that Google Follow button and YOU will be ENTERED in my
“Its a SURPRISE!” GIVEAWAY to be announced EVERY MONDAY! Yeppers! You read it right,
a Winner EVERY MONDAY!!! With GREAT Goodies you wont want to miss!!
Hope to see ya at Whassup Wednesday!!!
*ENTER LINKY PAR-TAY Here! *
xoxokara
So pretty! Love the flowers!
This is so pretty – I love it! : )
Lovely ! Beautiful flowers.
I am a new follower from the Creative Blogger Party & Hop.
Ana Paula.
I credited you again for your pink flower idea.
http://coffeeandtheirkisses.blogspot.com/2011/05/craft-scrapbook-anniversary-card.html
I am so glad I found your blog from Pinterest! Adding this wreath to my To-Do list. It is fabulous!
Hi – I am not sure if you answer questions, but thought I would try! I want to make something like this for my wedding, and I was curious how long the moss lasts so that I can figure out a good time to make something this. Also, where did you find the sheet moss you recommend getting?
Thanks so much!
Hi Meperez! I do always try to answer questions but you didn’t leave an email address for me. Hope you get this! The moss is a dry moss so it pretty much lasts forever. It does, however get faded by the sun over time so don’t leave it out in direct sunlight until your wedding. {I might have to try to spray paint it next year when I pull it out again!} I’m pretty sure I picked up my sheet moss at Jo-Annes but I know Michaels has some too and I have seen it before at Walmart. Good luck with your wedding!
Jenn 🙂
Oh my, take a bow!
You’ve put a “spring” in my step with your creative loveliness.
Have a blessed day!
I hope you will share this starting tonight at The CSI Project, The challenge is Spring Vignettes and Decor. That includes Easter. It will be a great party!!! Lots of inspiration.
http://www.thecsiproject.com
hugs,
Dee, the CSI Girl